# Exploded View
Used to generate and display exploded views in which components within an assembly are scattered.
# New Exploded View
Click the New Exploded View  command to pop up the following dialog box

- View Name: The name used to set the explosion view.
- Explosion Steps: Used to record the explosion sequence.
- Edit Existing steps: Click to select an already created step, you can directly modify.
- When editing an existing step, "distance direction, rotation axis" cannot be modified.
- After modification, click "Next" to return to the state of new step.
- Smart New Step: Automatically save and create a new step when the condition is met.
Unchecked (default) : Save the current parameter and create a new step only when you click Next.
Checked: Automatically saves current parameters and creates a new step when switching the transformation method or clicking the clear button
 at the top right of the Selection Box to clear selected components. Even when checked, you can manually click Next to save current parameters and create a new step.Transform object: Used to pick up the instance to be moved, support multiple selection.
- Mode: Supports three moving modes: "Move by XYZ, move by distance, rotate".
- Mode of use:
- Choose to move the instance baffle bracket, nylon plate, XYZ translational mode, the instance will display an operable blue coordinate system, by dragging the coordinate system arrow, or enter the XYZ value to move the instance.
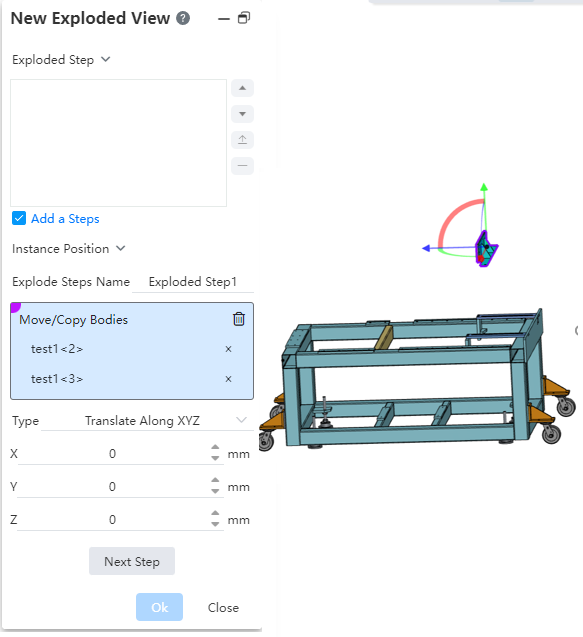
- After moving the instance to the desired position, click Next, save the current transform parameter as "Explosion Step 1", explosion step 1 is displayed in the list. Clear the parameters in the selected parts and Transform Mode in the Instance Location setting item.
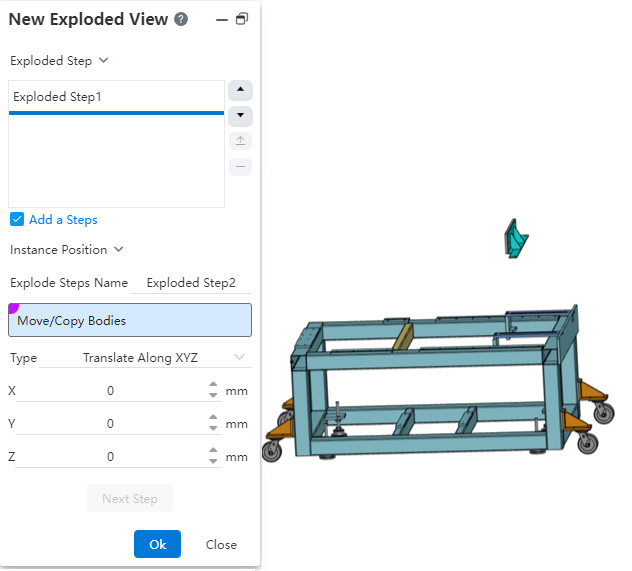
- Select the footing, switch to the shift by distance mode, select the direction and drag the arrow, or enter the distance to change the position of the instance. Click Next to save the current transform parameter as "Explosion Step 2" and Explosion Step 2 is displayed in the list. Clear the parameters in the selected parts and Transform Mode in the Instance Location setting item.

- Continue until you have completed all explosion steps.
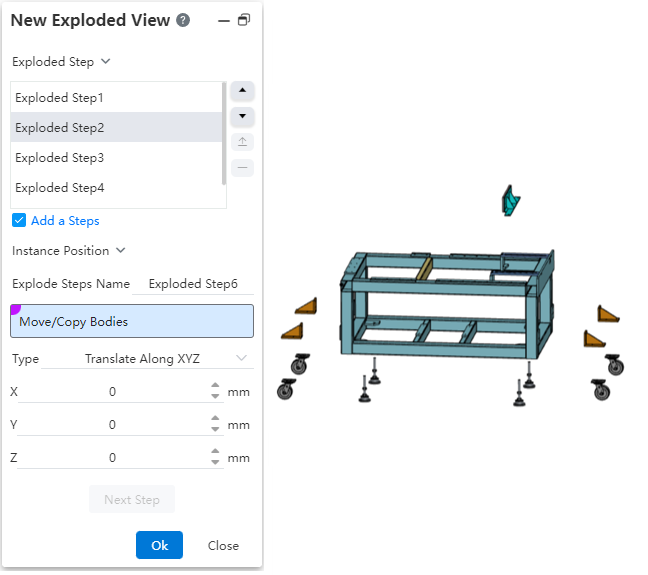
- Click OK to generate the explosion view. The resulting explosion view is saved in the 【View Panel】 on the left side of the viewport.

# Activate Exploded View
Exploded views can be activated in several ways.
Method 1: In the view panel , left-click to select the explosive view you want to activate and click the Explosive View command to activate the explosive view.
Method 2: Right-click the exploded view to be activated in the view panel, and click Activate to activate the exploded view.
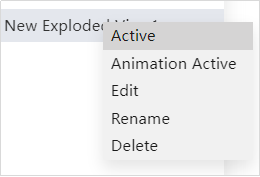
When an exploded view is active, the exploded view command button is highlighted, and there is a blue breathing box around the currently active exploded view in the view panel.
# Delete Exploded View
The exploded view can be turned off in the following ways
Method 1: Click the exploded view command to close the exploded view.
Method 2: Right-click any exploded view in the view panel, and click "Deactivate" to close the exploded view.
# Default Exploded View
Each assembly document contains a default exploded view. When this view is activated, the system will automatically disperse the components in the assembly according to certain rules.
The default exploded view is saved in the view panel along with the views newly created by the user, and editing/renaming/deleting operations are not allowed.
# Animation Active
Supports the playback of controlled explosion animations.
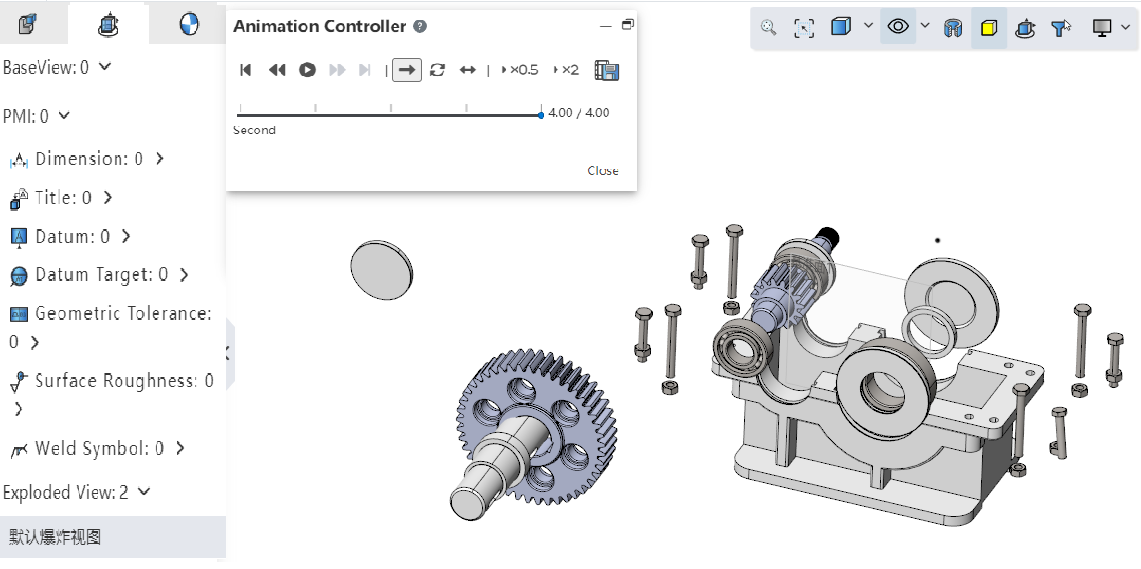
Right click the explosion view and click the "Animation Active" option to pop up the animation controller.
Animation controller function description
| Name | Instructions |
|---|---|
| Getting Started | Return the animation to the first screen |
| Previous Step | Click Pause to return the animation to the previous picture |
| Play/pause | Play/pause the animation |
| Next Step | Click Pause to return the animation to the next screen |
| End | Move the animation to the last screen |
| Single play | Show the animation once from start to finish, then stop |
| Loop back | Play in a continuous loop (start to end) until you click Pause |
| Play back and forth | A continuous loop of playback (start to finish, end to start) until you click Pause |
| Slow playback | Play the animation at half normal speed |
| Play quickly | Play at twice the normal speed |
| derive | Export animation |
# Explosion Animation Export
Supports saving the explosion animation as a video to the local.
Right-click the explosion view in the view panel and select "Animation Activation".
Pause playback.
Click the Export button.

Set the video parameters.
Click OK to finish saving.
Dialog box description:
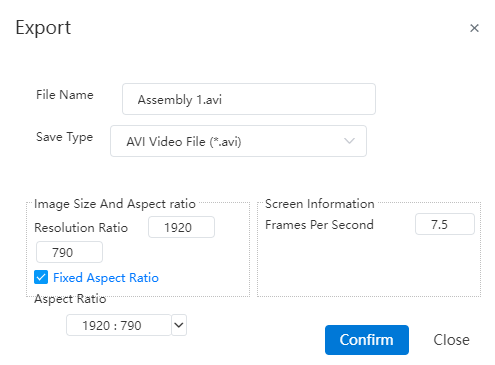
File name: Set the name of the exported video file.
Save type: Set the type of video file to be exported.
Resolution: Set the video resolution.
Fixed Aspect Ratio: Check this to keep the selected "Aspect ratio" when modifying the resolution.
Aspect Ratio: Set the aspect ratio of the video.
Frames per second: Sets the number of frames of the video.
# Other
Right-click on the view panel to customize the generated explosion view. You can perform the following operations:
Edit: You can modify the location of the instance in the explosion view;
Rename: Rename the Explosion View;
Delete: Delete Explosion View