# Product Navigation
Product Navigation Overview:

The product navigation function is a fast and clear overall assembly planning module, which is convenient for users to quickly establish the project, and check the overall design of the project in the later stage, and export relevant information; The new assembly structure tree can also interact and assemble with the existing assembly structure.
# Entry
Click the button  on the title bar to access the product navigation interface.
# Product Navigation Operations
The product navigation module implements the basic operation of the structure tree by dragging and dropping.
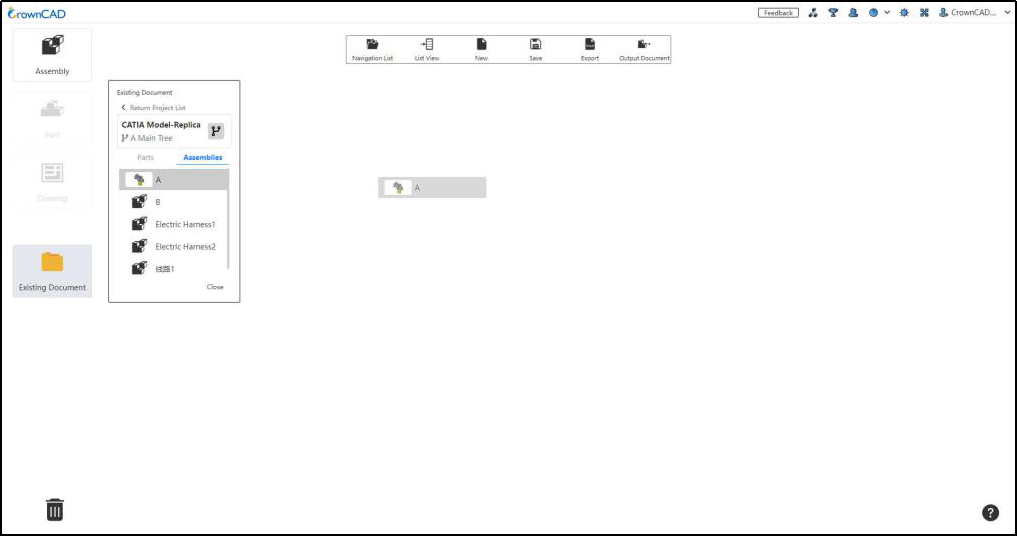
- Hold down the left mouse button and drag the "Assembly" icon in the upper left corner of the interface to the blank area of the viewport. Release the mouse to create a blank assembly.
- Continue dragging "Assembly, Parts" in the upper left corner onto the assembly icon in the viewport to create a blank subassembly/part under the assembly.
- You can also insert an existing part/assembly into the product navigation. Click on the "Existing Files" icon to find the desired part/assembly in the dialog box that opens, again by dragging and dropping it onto the assembly in the viewport.
- Drag and drop the engineering drawing icon onto the part/assembly in the viewport to generate the engineering drawing for it. Point to the engineering drawing icon without clicking, in the template list that pops up, you can also select a specific engineering drawing template.
- Note that parts and assemblies can only be dragged and dropped onto assemblies, and drawings can only be dragged and dropped onto parts and assemblies.
By manipulating the ICONS in the viewport, you can modify the name, quantity, and so on.
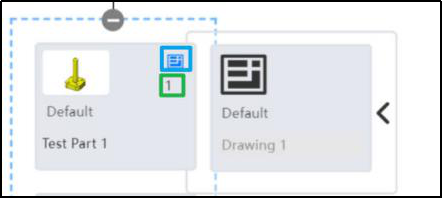
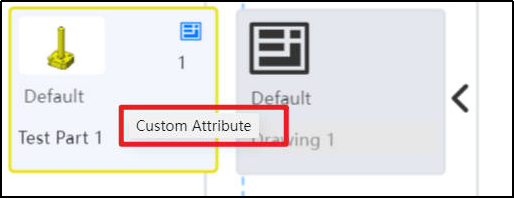

- Right-click on the yellow highlighted area, then select the “Custom Attribute”option. In the dialog box that appears, you can modify parameters such as name, material, mass, and type.
- Click on the green box area and enter the quantity.
- When the assembly/part has a corresponding engineering drawing, a blue box mark will appear, click to expand and collapse the engineering drawing.
Drag unwanted documents to the bin icon in the lower left corner to delete them.

# Toolbars
| Tools | ICONS | Features |
|---|---|---|
| Navigation list |  | View the navigation list saved within your current account |
| List View |  | View structural and component information for the current assembly in tabular form |
| New |  | Create a new blank product navigation |
| Save |  | Save the current structure tree to the navigation list with a customizable save name |
| Export |  | Export the current assembly structure and parts information in Excel form |
| Output Document |  | Generate a project with a customizable name that contains documents in the product navigation.Reference the existing assembly structure, adjust the structure, the output document can choose how to deal with the existing parts. (1)Copy all: Copy all the existing parts to the new project, reference the copied new document. (2)Copy only the modified assembly: Copy the modified existing assembly into the new project, and reference the source document for the other parts. (3)Modify and reference the source document: Without copying, modify and reference the source document. Select this method, when the top-level assembly is an existing assembly, you do not need to give the project name, directly in the assembly original project to create a new document and modify the existing assembly. |