# Pipe Auto Line
# Hard Pipe
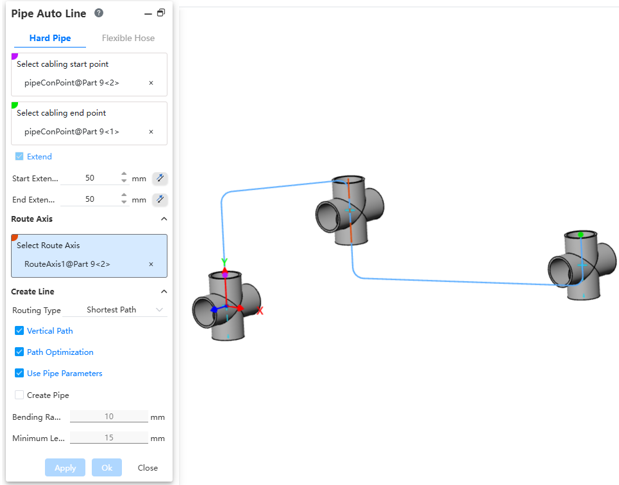
After creating or activating a piping route, automatically draw a path line between the two selected connection points.
How to use:
Insert piping components.
Click the "Auto Routing" command and select the start and end points of the route.
Choose whether to extend the route outward as needed.
Decide if you want to pick the path axis. If you do, you can set the direction for each path axis.
Select the routing method.
Choose whether to use a vertical path as required.
Set pipe parameters and decide whether to create the pipe.
Dialog Box Control Instructions:
Routing Start/End Points: You can select all connection points and the endpoints of the current piping path.
Extend Outward: When checked, the automatic routing path line will generate two additional lines at the beginning and end, extending along the direction defined by the rule.
Routr Axis:Pick one or more path axes existing in the current pipeline.
Reverse Direction: After selecting a path axis, use this option to adjust the direction in which the path line passes through the axis.
Routing Method: Choose between the shortest path or routing along the coordinate axes.
Vertical Path: Appears when the routing method is set to shortest path. When checked, the automatically generated path lines will be perpendicular to each other.
Routing Order: Appears when the routing method is set to along coordinate axes. When checked, you can select the sequence of the three coordinate axes for routing.
Use Pipe Parameters: When checked, all subsequent dimension parameters after path creation are grayed out and use data from the "Pipe Parameters" settings. If unchecked, users can customize the pipe parameters.
Create Pipe: When unchecked, only the path is drawn without creating a pipe (default). When checked, the pipe is created simultaneously with the path based on the selected options and values. Users can customize pipe parameters and choose whether to use grade-driven settings.
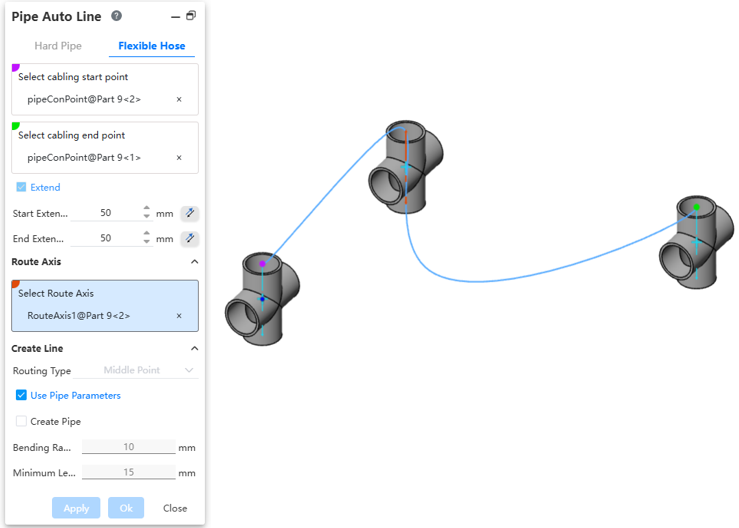
# Flexible Hose
After creating or activating the pipe, automatically draw the hose path line between the two selected connection points.
How to use:
Insert pipeline components or draw the path.
Click the "Pipe Auto Line" command to switch to Flexible hose.
Select the start and end points of the line separately.
Set the outward extension length.
Choose whether to pick the path axes as needed. When picking path axes, you can set the direction for each path axis.
Select the wiring method.
Set the pipeline parameters and choose whether to create the pipe.
Dialog Box Controls Description:
Start/End point: Can select all connection points and the endpoints of the current pipeline path line.
Extend Length:Additional front and back two lines are generated for the automatic path line along the rule-defined direction.
Route Axis: Can pick one or multiple path axes from the current pipeline.
Reverse Direction: After picking the path axis, this option can adjust the direction of the path line passing through the path axis.
Wiring Method: Can select midpoint, endpoint, or all points.
Use Pipeline Parameters:After checking,all subsequent dimension parameters for drawing the path are grayed out and use the data from “Pipeline Parameters.”If unchecked,the user can customize the pipeline parameters.
Create Pipe:When unchecked,only draw the path without creating the pipe;default is unchecked.When checked,generate the path and create the pipe according to subsequent options and values.The user can customize pipe parameters and whether to use level drive.