
# BOM
# Custom Properties
# Property Association with Dimensions
Custom Properties now supports an expanded range of associated properties, allowing you to pick model dimensions, global variables, and mass properties data. It also supports the combination of data and text to express product specifications and other information.
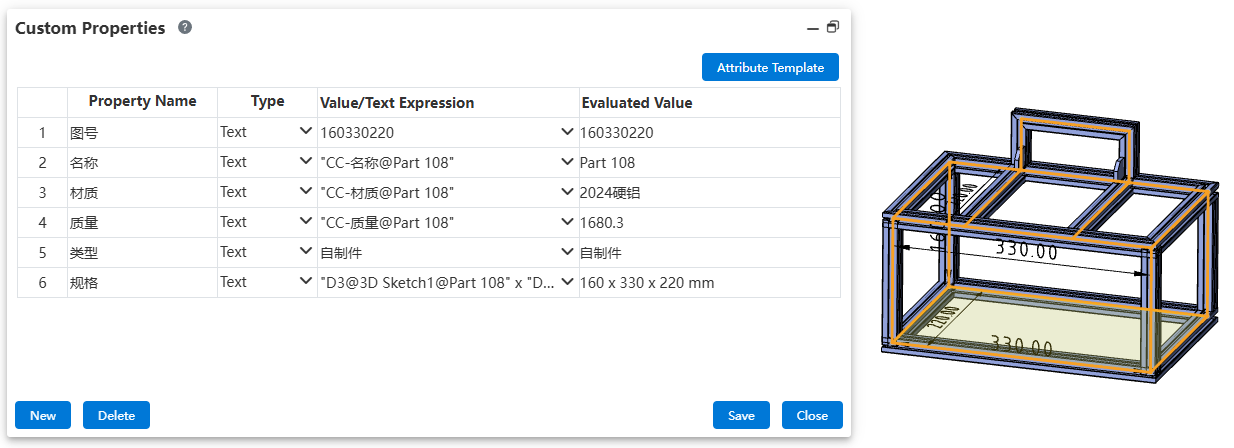
Usage:
- Open Custom Properties.
- Create a new property as needed.
- In the row where you want to set the property value, click Value/Text Expression. Add an expression using one of the following methods: a. Text: Enter text or symbols directly. b. Dimensions: In the viewport or the Feature Manager, double-click the feature or sketch containing the dimension. Once the dimension is displayed in the viewport, click the dimension to add it to the expression. c. Units: Click the dropdown arrow to the right of Value/Text Expression, and select the desired unit type from the dropdown menu. d. Global Variables: Click the dropdown arrow to the right of Value/Text Expression, and select the desired global variable from the dropdown menu. Prerequisite: A variable must have been manually created in the document to use this function. e. Properties: Click the dropdown arrow to the right of Value/Text Expression, and select the desired property from the dropdown menu. Available properties include the current document's name, material, owner, mass properties, and other information.
- Check the Evaluated Value to see if the property value meets expectations. If not, modify it in Value/Text Expression.
- Continue adding, deleting, or modifying properties as needed.
- Click Save to complete the setup.
Notes:
- Property Expression Content: A single property expression can combine multiple types of information, such as text + dimensions.
- Numerical Precision:
- The dimension precision of sketch dimensions follows the setting of the dimension itself.
- The precision of variables, feature dimensions, and mass properties follows the precision setting under System Settings - Document Properties - Units.
- Zero Value Display: The zero value display rule for each value follows the setting under System Settings - Document Properties - Dimensions - Zero Value Display - Property.
- Units: The specific units for each type of value follow the setting under System Settings - Document Properties - Units.
- The numerical precision, zero value display, and units of a property are controlled by the document property settings of the part/assembly document where the property resides. When generating drawings, the property value content is independent of the drawing's document property settings.
# BOM Tools
# Thumbnail Preview and Export
The BOM Tool now supports previewing and exporting model thumbnails, improving material identification efficiency and report readability.
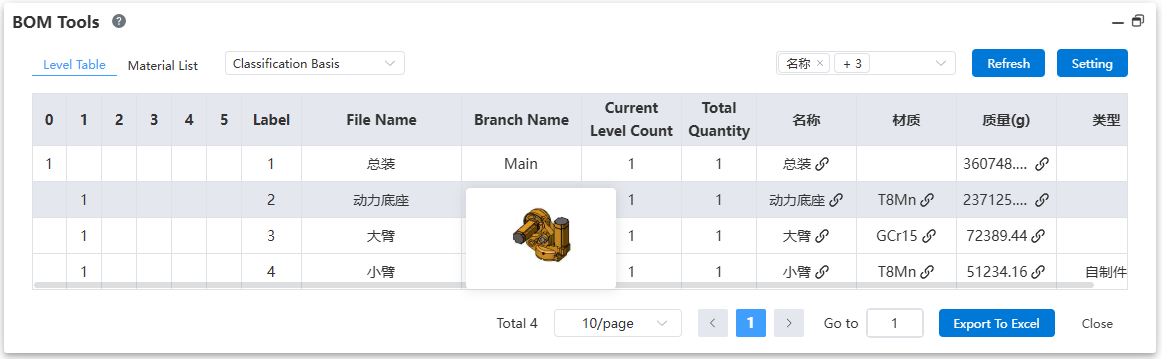
Thumbnail Preview Usage:
- Open an assembly document and click the "BOM Tool" command in the BOM module.
- Hover the mouse over the "File Name" of a model in the table. A thumbnail preview of the corresponding model will pop up near the cursor.
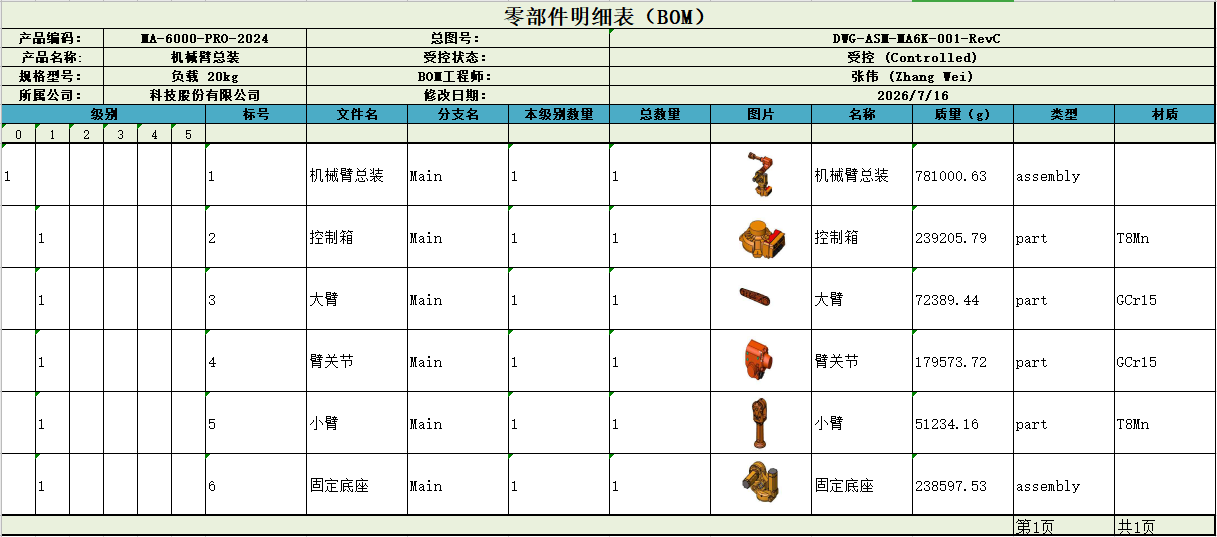
Thumbnail Export Usage:
- Open an assembly document and click the "BOM Tool" command in the BOM module.
- Click "Export to Excel" and select an export template that includes screenshots.
- Click "Export" to complete the export.
Export Template Setup:
- Open "System Settings - System Options - Template Management". Select the template type as "BOM Export Template", and then select the table type to configure as needed: "Levels Table" or "Detail Table".
- Click the "Upload" button.
- On the upload interface, click the "Download" button to download the template sample file.
- Open the sample file. It contains two sheet pages: a. Sheet1: Used to control the cell style, background color, font, borders, etc., of the table. b. Setting: Used to control what information should be filled in each column of the table, whether to paginate, and other settings. For details, refer to the instructions on the Setting page. Use "#Screenshot" to indicate where the thumbnail should be placed.
- Modify the template content as needed. The following is an example explanation: a. Change the content of cell L6 in Sheet1 from "Drawing Number" to "Image". When exporting, this cell will display the text "Image". b. Change the content of cell L1 in the Setting sheet from "Drawing Number" to "#Screenshot". Keep the content of L2 as "L". This means that when exporting, column L will be filled with screenshots. c. Since the starting row number is set to 8 in cell B8, the model content will be populated starting from row 8 when exporting. The title bar information before row 8 will not be affected. d. Final effect: In the exported table, the content of row 6 in column L is the header text "Image", and starting from row 8 downwards, screenshots of each model row will be filled sequentially.
- Drag and drop the modified template file into the upload window.
- Click "Upload" to complete the template setup.
Note 1: Models that have never been opened have no thumbnails. You can open them once, and the system will generate thumbnails for them. Note 2: Standard parts and virtual components do not support thumbnails.
# Setting Material
The BOM Tool now supports directly setting the material of parts within the tool, improving ease of use.
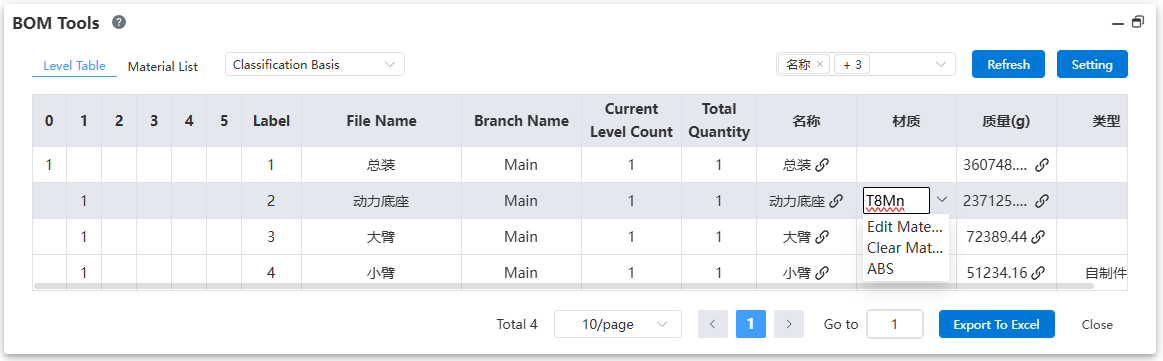
Usage:
- Open an assembly document and click the "BOM Tool" command in the BOM module.
- Double-click the material cell corresponding to the part for which you want to set the material.
- Click the arrow on the right to open a drop-down menu: a. The menu displays favorited materials. Click one to apply it directly. b. Use "Edit Material" to open the material library and set the material. c. Use "Clear Material" to remove the material from the part.
- Set materials for other parts as needed.
- Click Close to exit the setup.
# Attribute Panel
# Switching Displayed Document
In an assembly, by selecting an instance, the Attribute Panel and Custom Properties dialog can automatically switch to display the corresponding document properties.
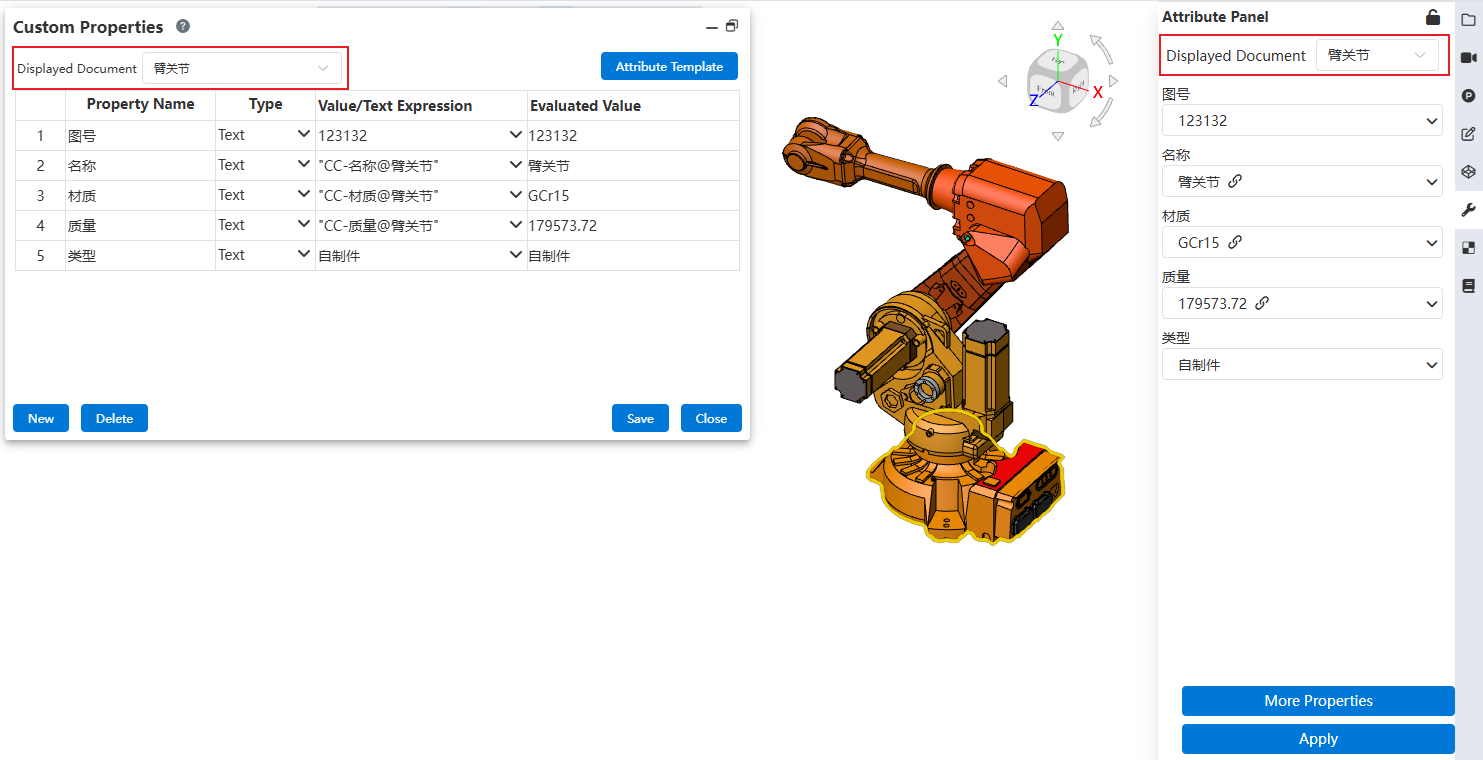
Usage:
- In an assembly document, click the "Attribute Panel" on the right to open the panel, or open the "Custom Properties" command dialog.
- Click the "Lock" icon at the top right of the panel to keep the panel expanded.
- Click an instance in the viewport or in the Feature Manager on the left. The content of the Attribute Panel will switch to display the custom properties of the corresponding component document.
- Use the "Display Document" drop-down list to switch and view the properties of other components within the current assembly.
# Displaying Multi-Document Properties
In an assembly, when multiple parts or sub-assemblies are selected, the Attribute Panel and Custom Properties dialog can simultaneously display the property content of the selected documents, facilitating batch property settings.
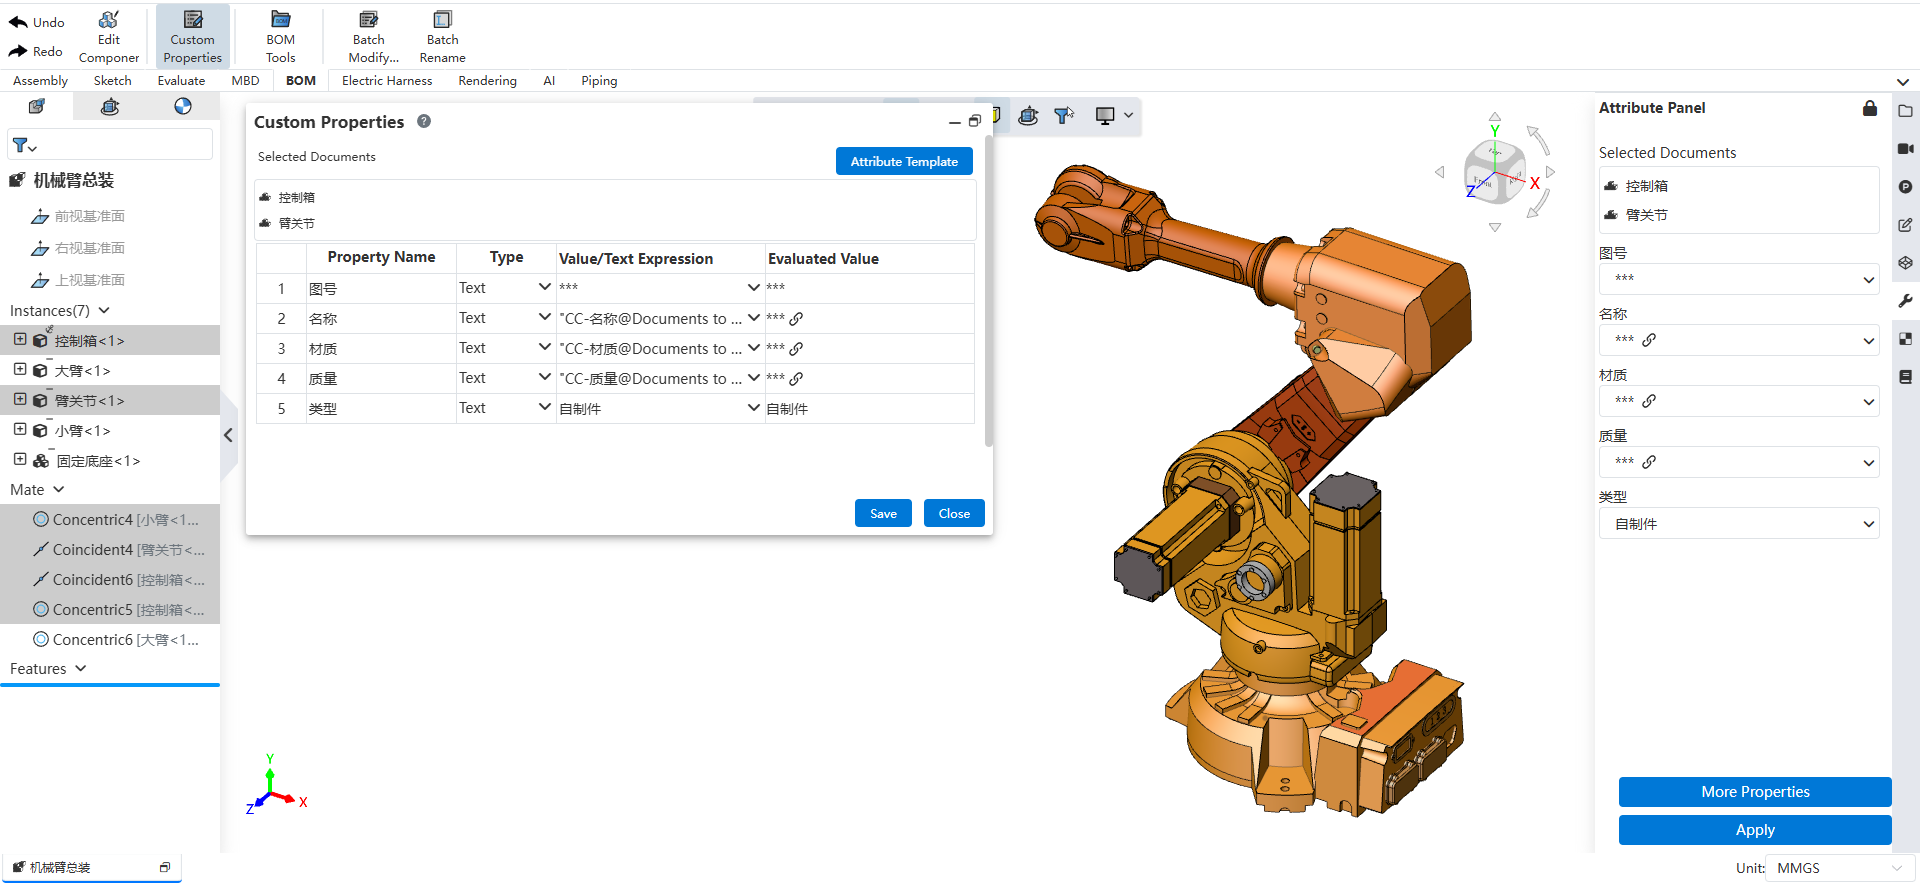
Usage:
- In an assembly document, click the "Attribute Panel" on the right to open the panel, or open the "Custom Properties" command dialog.
- Click the "Lock" icon at the top right of the panel to keep the panel expanded.
- Hold down the Ctrl key and select multiple parts or sub-assemblies in the viewport or in the Feature Manager on the left.
- The content of the Attribute Panel displays the properties of the selected components. For properties with different values, "***" is displayed; for properties with identical values across all selected components, the specific value is shown.
- Modify a property value, and the corresponding properties of all currently selected components will be updated synchronously.
- Click Save/Apply to end the modification.
Note 1: When selecting multiple documents, their document types must be the same (e.g., all parts or all assemblies). Mixing parts and assemblies will prevent property information from being displayed.
Note 2: The "Custom Properties Template" of the selected documents must be the same. When multiple documents are selected, only the properties defined in the Attribute Panel are displayed; individually added properties in a document are not shown. You can switch the "Custom Properties Template" by clicking the "Property Template" button in the Custom Properties dialog.
Note 3: The selected documents must not be in an unloaded state.
# Searching Material
The Attribute Panel now supports searching for materials when setting a material, improving efficiency.
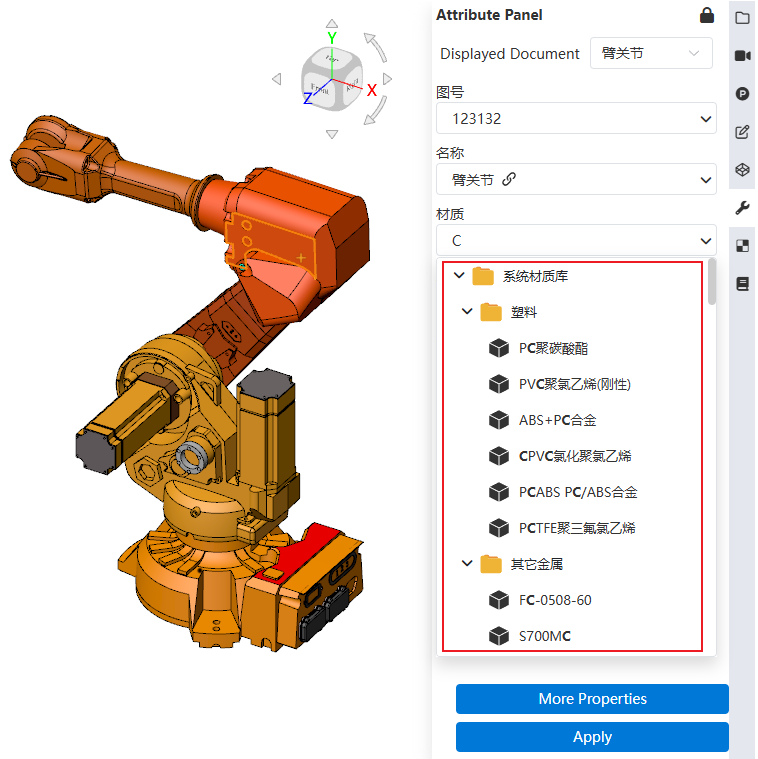
Usage:
- In an assembly document, click the "Attribute Panel" on the right to open the panel.
- Directly enter text in the input box of the material property.
- Below the input box, materials related to the entered text are automatically searched and displayed.
- Click a search result to complete the material setting.
Note: If the entered text has no matching results in the material library, and you continue to save, the material property will be disconnected from the document's material association, and the entered content will be set as a plain text property. To restore the association between the property and the document material, set the material property to "CC-Material".
← Sheet Metal Library →