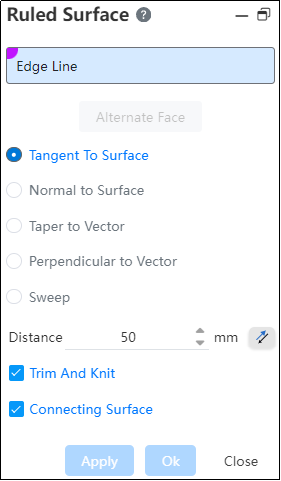
# Ruled Surface
Select an edge line to produce a straight grain surface.
Instructions for use
Click  to enter the stitching command interface, as shown in the picture below.
The meanings of each control are as follows:
- Edge line: Used to pick up the solid or surface edge line to generate a straight surface. Click on the back arrow to expand and fold the group.
Note:
Pickable types: curved edges, solid edges; Multiple edges can be selected, and the multi-selected edges can be located on different entities and surfaces without connection.
Alternate surface: Click to select any edge line in the pick box. When the edge line is the common edge line of two faces, click the "alternate surface" button to switch the reference surface of the edge line.
Type: Used to select the type of the generated straight grain surface, support intersecting on the surface, orthogonal on the surface, coning to a vector, perpendicular to the vector, scanning, each way example:
| Mode | Legend | Instructions |
|---|---|---|
| Tangent to surfaces |  | A straight grain surface is tangent to the reference surface of the selected edge line |
| Orthogonal to the surface |  | A straight grain surface is perpendicular to the reference plane of the selected edge line |
| Scan |  | Stretch the selected edge in the chosen direction |
| Taper to the vector | 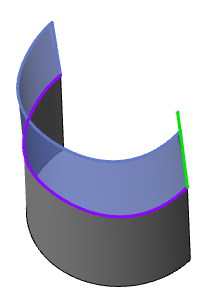 | Draw the selected edge line along the selected direction and pull the die set Angle. After drawing the die, the curved opening tends to expand in the selected direction. |
| Perpendicular to the vector |  | Let the selected edge line consist of an infinite number of consecutive points ABC.. Is composed of. Point A is the edge end point. Pass point A to make plane A1 perpendicular to the selected edge, pass point A to make plane A2 perpendicular to the selected direction, and the intersection line A3 of planes A1 and A2 is the edge line of the straight surface at point A. Draw B3.C3 in the same way... These intersecting lines together form a straight surface. |
- Length/direction: Used to set the parameters of the straight surface. The Settings vary according to the selected type.
"Tangent to surface" setting item: Length value, reverse button

- Length default value 50, length value can be entered range > 0
"Orthogonal to Surface" setting item: Length value, reverse button
- The default length value is 50, and the length value can be entered in a range > 0.
- Click the reverse button to reverse the length direction.
"Scan" setting items: length value, "direction, coordinates" option, select "direction" to display "direction pick up box, reverse button"; Select "Coordinates" to display "XYZ input box"


- The default length is 50, and the length value can be entered in a range >0.
- When selecting the "direction" mode: the direction pickup box is displayed, and the length direction can be reversed by clicking the reverse button. The direction pick up box can pick up elements in the same direction as the stretch boss.
- When the "Coordinate" mode is selected, the XYZ input box is displayed without a reverse button. XYZ can enter positive and negative values and reverse through the positive and negative control. X.Y.Z has a default value of 1.0.0, not all zeros.
- The default is "direction" mode.
"Taper to vector" setting items: length value, direction pick box, reverse button, Angle value.

- Length default value 50, length value can be entered range > 0.
- Click the reverse button to reverse the length direction.
- The direction pick box can pick up elements in the same direction as the stretch boss.
- Angle default is 1°, 0° < Input range < 90°.
Click the Reverse button to reverse the Angle direction. "Perpendicular to Vector" setting item: Length value, direction pick box, reverse button.
- Length default value 50, length value can be entered range > 0.
- Click the reverse button to reverse the length direction.
- The direction pick box can pick up elements in the same direction as the stretch boss.
Stitching: Controls whether or not the connected straight surfaces are stitched together into one surface.
Joining surfaces: Controls whether to create a joining surface at the sharp corner of two straight grain surfaces.